Dropbox Integration Setup
Introduction
QuickFile can connect securely to your Dropbox account to automatically import receipts and other business documents to your Receipt Hub.
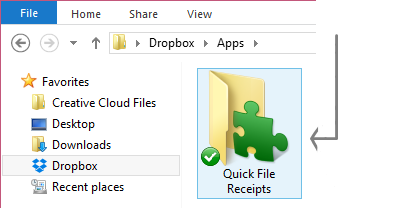
When you link QuickFile to Dropbox, a dedicated folder is created in your Dropbox account:
Dropbox/Apps/Quick File Receipts/..
Any files placed into this folder are automatically imported into the QuickFile Receipt Hub, where you can:
- Preview the document
- Apply AI analysis to extract key information and suggest tagging options
- Link it to an existing purchase
- Create a new purchase record
- Move it to the Document Manager
Important: QuickFile only has access to this specific folder. It cannot view, edit, or access any other files in your Dropbox account.
Setting up Dropbox integration in QuickFile
Linking your Dropbox account to QuickFile takes just a few steps:
- Log in to QuickFile and go to Account Settings
- Under 3rd Party Integration, select Cloud storage integrations
- Click on the Dropbox logo and then click Connect
You will then be redirected to Dropbox, where you must:
- Log in to your Dropbox account
- Authorise QuickFile by clicking Allow
Once authorised, the integration is complete and your Dropbox folder will be ready to use.
Import receipts from your smartphone
One of the key advantages of the Dropbox integration is the ability to capture receipts on the go.
Using the Dropbox mobile app on iPhone or Android, you can:
- Photograph receipts directly from your phone
- Automatically sync them to your Dropbox account
- Have them imported into the QuickFile Receipt Hub
Dropbox also includes built-in scanning and image enhancement tools to improve legibility.
Supported file types
QuickFile will automatically import the following file types from Dropbox:
- PDF documents
- Images (PNG, GIF, JPG, TIF)
- Word documents (including RTF)
- Excel spreadsheets (including CSV)
- Text files (Notepad)
- HTML documents
Any unsupported file types will be ignored.
You are not limited to receipts. You may also upload other business documents such as:
- Letters and correspondence
- Bank statements
- HMRC documents
- Contracts and agreements
Documents imported into the Receipt Hub can later be moved into other folders as required.
Managing multiple QuickFile accounts from one Dropbox
You can route files to multiple QuickFile accounts from a single Dropbox account.
To do this:
- Create a sub-folder for each QuickFile account
- Name each folder using the relevant QuickFile account number
Example folder structure:
Apps/Quick File Receipts/[Quick File Account Number]/..
Files placed into each sub-folder will automatically upload to the corresponding QuickFile account.
Note: You must authenticate the same Dropbox account separately within each QuickFile account.
For further details, see the Community Forum article:
Dropbox Custom Folder Suffixes.
Automatic archiving
Once a file has been successfully uploaded to QuickFile, it is automatically moved within Dropbox to a special Imported folder.
This ensures:
- Files are not re-imported
- You retain a local Dropbox backup of all uploaded documents
Data limits
Each QuickFile account has a daily Dropbox transfer limit of 262 MB. QuickFile also has an individual file size limit of 5 MB, any files that exceed this will be ignored.
If the total size of files placed in the Dropbox folder exceeds this limit:
- Files up to the limit will be imported
- Remaining files will be ignored until the limit resets the following day
How long does an import take?
When a file is added to the designated Dropbox folder, Dropbox notifies QuickFile immediately.
In most cases, files appear in the Receipt Hub within five minutes, depending on:
- File size
- Internet connection speed
If files do not appear, the most common reasons are:
- Unsupported file type
- Daily transfer limit exceeded
- Duplicate file name exists already present in the Receipt Hub
You can also use the “Sync” button to manually query your Dropbox account for any new files.
A more detailed troubleshooting guide is available below:


