Importing your bank statement
Uploading your bank statement to QuickFile is easy. Most UK banks will enable you to download a file containing your transactions from within your online banking application.
QuickFile currently supports the following file types:
- Excel (csv)
- Microsoft Money (ofx)
- Quickbooks (qbo)
- Quicken (qif)
- Text file (txt) - Santander only
Once you have obtained one of the above files you can then start the upload process by first navigating to the bank statement screen to which you would like to add the data.
Import using a template
We have a list of common banks with templates already set up. If your bank is listed, you can use one of these, or you can create your own (see below).
Don’t forget you can now also connect an automatic bank feed with Open Banking
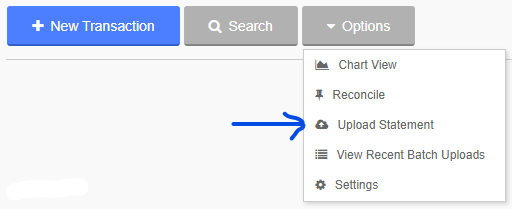
On your statement screen, if you go to ‘Options’ you will find the option to ‘Upload Statement’. Click the option to continue.
On the “Upload Banking Data” screen you will see a list of bank names in a drop-down menu. Select the appropriate bank from the list. Listed banks are recognized by QuickFile and it will not be necessary to manually allocate the columns (for CSV). If you are uploading an Excel (CSV) file and your bank is not listed, select the “Other” option.
Tip
By using “Other”, you can define your own template and even save it to speed things up next time
You will now need to upload your bank statement file to QuickFile. Browse for the location of the file on your local computer and then click the ‘Upload’ button.
When uploading a new bank statement QuickFile will automatically check for any potential duplicate entries. If a suspected duplicate entry is found, you will be given the option to ignore and save the new entry or to skip to the next one.
Importing using “Other”
Uploading a CSV file and selecting the option “Other” when nominating your bank will bring up a preview of the CSV file showing the order of the columns and the first 4 rows of information.
You will need to tell QuickFile where to look for the ‘Transaction Date’, ‘Description’ and ‘Amount’ in the green bar above the table. In each case where the corresponding information can be found, highlight the column and once you have completed this, click on the “Confirm” button below.
You also have the option to select two value columns should your bank provide both a Money In and a Money Out column. Some credit card providers also reverse the values (e.g. money in is shown as a negative value, and money out is shown as a positive value). In this case, you can tick the box to reserve the amounts.
The above screenshot shows an example credit card statement.
Once your entire statement has been uploaded you will see a confirmation message.
Saving a new template
As you have used a custom mapping by selecting Other, you will also be prompted to save it as a template:
Enter a name and save it, and speed up your import process next time around -
Bank Tagging
Now you’ve imported your transactions, you are now ready to start tagging your bank transactions. Be sure to read our guide on Bank Transaction Tagging to save time on your bookkeeping.


