Supplementary Pages
Supplementary Pages provide a convenient way to attach extra pages to your invoices and estimates. You can create your own templates for all sorts of additional content such as terms and conditions, product instructions, approval forms and return slips.
Supplementary Pages differ from file attachments as they appear as a continuous part of the invoice rather than a separate document that the client can download.
Create your template
Supplementary pages work from predefined HTML templates. These templates are created and stored in the Advanced Design Customisation area. Let’s go ahead and create a simple template.
Before we start this feature will require a Power User Subscription. You can find out more about upgrading to a Power User here.
In the Account Settings menu select the option “Design Customisation”, then select the option “Advanced CSS & HTML Customisation”.

In the left hand pane you will see two header tabs, one labelled “HTML Snippets”. Under this tab is the home for any custom HTML templates utilised in QuickFile.
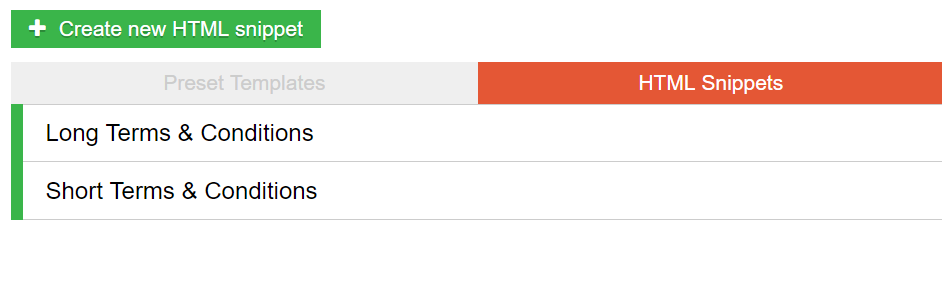
Click the button “Create new HTML snippet”.

In the right hand pane you can now draft your HTML supplementary page template. Don’t worry if you’re not an expert when it comes to HTML, you can do quite a lot with a few basic HTML tags.
Here’s an example of a simple set of terms and conditions.
    <h1>Terms and Conditions</h1>

    <p>Enter your terms and conditions here.</p>

    <p>Some more terms and conditions go here.</p>

    <p>Here's some <b>bold</b> text</p>
Here are a few formatting tags you can use.
    <b>Bold</b>
    <p>Everything here will be formatted into a paragraph</p>
    <i>Italics</i>
    <u>Underline</u>
    <h1>Header 1 size, you can also change to h2, h3, h4 etc to alter the size</h1>
When you’re done editing click the “Save file” button.
Import your template to an invoice or estimate
OK now your template has been created it’s time to import the template to an invoice or estimate. Let’s first go to the invoice or estimate preview screen. Now at the foot of the invoice you will see a small strip with the text “Add Supplementary Pages”.

When you click on this strip you will see a menu containing all your HTML templates, simply select the template you’d like to use and click the “Attach” button. The supplementary page will then be appended to your invoice or estimate.

Using custom tokens
You can use custom tokens within your Supplementary Pages as a way to merge in customer or invoice details as required. Here is a list of supported tokens available within Supplementary Pages.
@ClientName@
@ClientAddress@
@InvoiceNumber@
@InvoiceIssueDate@
@TotalAmount@
@InvoiceContactName@
@DefaultContactFirstName@
@DefaultContactSurname@
Show a warning when supplementary pages are attached
You may also want to show a pop-up notification when Supplementary Pages are attached. This can be useful if you’d like to get your client to acknowledge that they’ve seen and understood the information in your Supplementary Pages e.g. Terms and Conditions. We refer to these as Pre-Acceptance Notifications.

You can find out more about Pre-Acceptance Notifications here.
What will my client see?
When your client clicks to preview their invoice or estimate they will see your Supplementary Pages as a continuation of the main document. When a PDF version is generated the Supplementary Pages will also be visible.
Don’t forget you can always use the “impersonate” feature on the client detail screen to see exactly what your client will see.

Recurring Invoices
You can also attach Supplementary Pages to recurring invoice templates, any invoices created from a recurring template will automatically inherit it’s Supplementary Pages.
Useful Tools
Many businesses already have things such as return slips or terms and conditions saved as word documents or PDFs. Here are a few tools which may help convert them to HTML for you to use with QuickFile: